2D rigging in your browser: bones, IK and mesh deformation for cut-out characters
A rig lets you draw a character once and pose it forever. In pinkcel you add bones, attach each body part rigidly or as a bending mesh, pose with forward or inverse kinematics, and every pose becomes a keyframe. Free, with nothing to install.
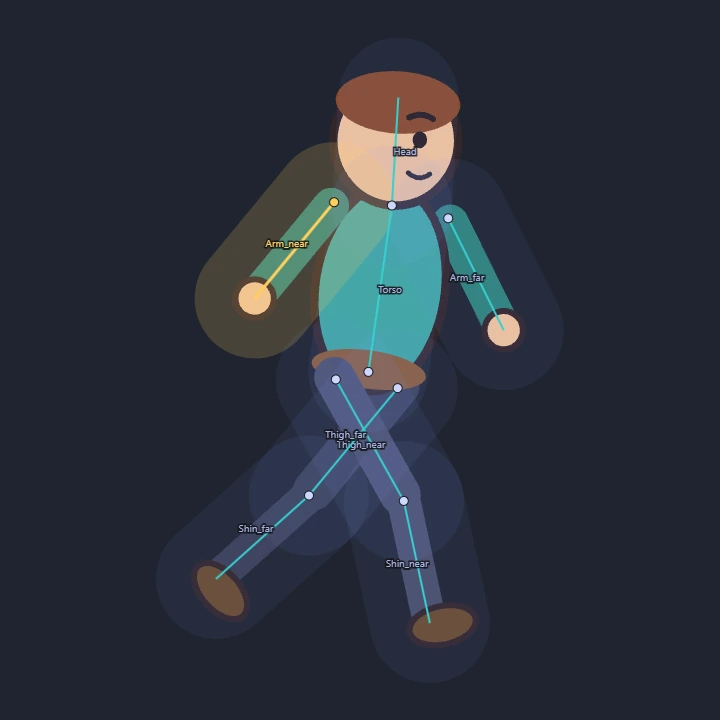
Prepare the parts
A cut-out rig works best when every part that moves on its own lives on its own layer: head, torso, pelvis, upper arm, forearm with hand, thigh, shin with foot. Draw them in pinkcel with the vector tools, or bring them in from a layered PSD.
- Round the ends. Where two parts meet, give both a rounded cap and let one slide under the other. A joint then stays closed at any angle.
- Draw a little extra. Make limbs slightly longer than they look at rest, so bending never opens a gap.
- Mind the stacking. The far arm and leg go below the torso, the near ones above it. Layer order is draw order.
Build the skeleton
- Pick the Bones tool (K) and drag the first bone from the hips up through the torso. The start of a bone is its pivot.
- Chain children. Start a drag on an existing bone to hang a new bone from it: head from the torso, upper arm from the shoulder, forearm from the elbow.
- Name the bones. Double-click a bone's name in the inspector. Clear names pay off later in clips and in exports.
- Check the rest pose. The pose you draw the bones in is the rest pose. Reset pose in the inspector brings one bone, or the whole skeleton, back to it.
Rigid or mesh binding
Each layer chooses how it follows the skeleton under Rig binding:
| Binding | What it does | Use it for |
|---|---|---|
| Rigid | The layer moves with one bone as a solid piece. | Classic cut-out: limbs, heads, props, anything that should not bend. |
| Mesh | The drawing is skinned to the nearby bones and bends smoothly at the joints. | Soft bodies, sleeves, tails, a torso that twists, arms drawn as one piece. |
| None | The layer ignores the skeleton. | Backgrounds, effects, anything animated on its own. |
Image layers can be meshes too: a painted arm from a PSD bends at the elbow the same way a vector one does.
Posing: FK and IK
Switch to the Pose tool (J) and drag a bone to rotate it. Children follow their parent, which is forward kinematics: the natural way to swing an arm from the shoulder.
Hold Shift while dragging the end of a chain for inverse kinematics: pull a hand and the forearm and upper arm rotate to reach it, or plant a foot while the hips move. Either way, each pose you set is written as a keyframe at the current frame, and a bone's first key also pins its rest angle at frame 0, so an animation always starts from the rest pose.
Weights, strength and control bones
A mesh layer decides how much each bone pulls each of its points. pinkcel computes this automatically from every bone's Strength, its radius of influence, so most meshes bend well straight away.
- Paint where it matters. The Weight brush (W) adds the selected bone's influence where you drag; hold Alt to take it away. A heat map shows the current weights.
- Strength 0 makes a control bone. It still moves its children and any rigidly attached layers, but never bends a mesh. Use control bones as roots, IK targets and handles for props.
- Choose which bones may bend a mesh. Under Bones that bend this mesh you can exclude bones from a layer, so the far arm never tugs at the near sleeve.
- Start over any time. Re-bake auto weights recomputes them after you move bones or change strengths.
Smart switches and joint fixes
Smart switch. A bone can drive a switch group: as the bone rotates from 0 to 90 degrees, the group flips between its drawings. Turn a "head" bone and the face swaps to the matching angle, or rotate a hand bone to change from a fist to an open palm. The keys stay on the bone, so posing the switch feels like posing anything else.
Joint fixes. The Morph brush (M) sculpts the posed mesh directly: pinch an elbow that folds badly at 90 degrees, and the correction blends in as the bone approaches that angle.
From rig to animation
- Make it a character. Select the group holding your parts and press Make character. It gets its own clips and its own skeleton.
- Create clips. Idle, walk, jump, attack: each clip is a short, self-contained animation you pose on the timeline.
- Sequence them. Place clips on the main timeline, on several channels if you like, and move the whole character across the scene with root motion.
- Export. A video or GIF for sharing, a sprite sheet for any game engine, or a native skeleton scene for Godot.
FAQ
Can I animate without a skeleton?
Yes. Point animation keys the shape of a drawing itself: move its points on a later frame and the shape interpolates. It suits hair, cloth, mouths and squash-and-stretch.
Rigid or mesh: which should I start with?
Rigid. It is predictable and exports cleanly to every format. Switch individual layers to mesh when a joint needs to bend.
Does it support inverse kinematics?
Yes. Hold Shift with the Pose tool and drag the end of a chain.
Can I rig a painted character, not just vector drawings?
Yes. Import PNG or layered PSD art; image layers bind rigidly or as meshes like vector layers.
Is it free?
Yes. Rigging, animation and every export are free, and your files stay on your computer.
Rig your first character
Open the editor, draw or import a few parts and add bones. Your first pose is a couple of minutes away.
Open the editor, free