Make an animated sprite sheet from a rigged 2D character
Draw a character once, animate it with bones and keyframes, then bake every clip into a single sprite sheet: one transparent PNG atlas plus the frame range of each animation. It works in any engine, and it renders in your browser in seconds, at whatever frame size you need.
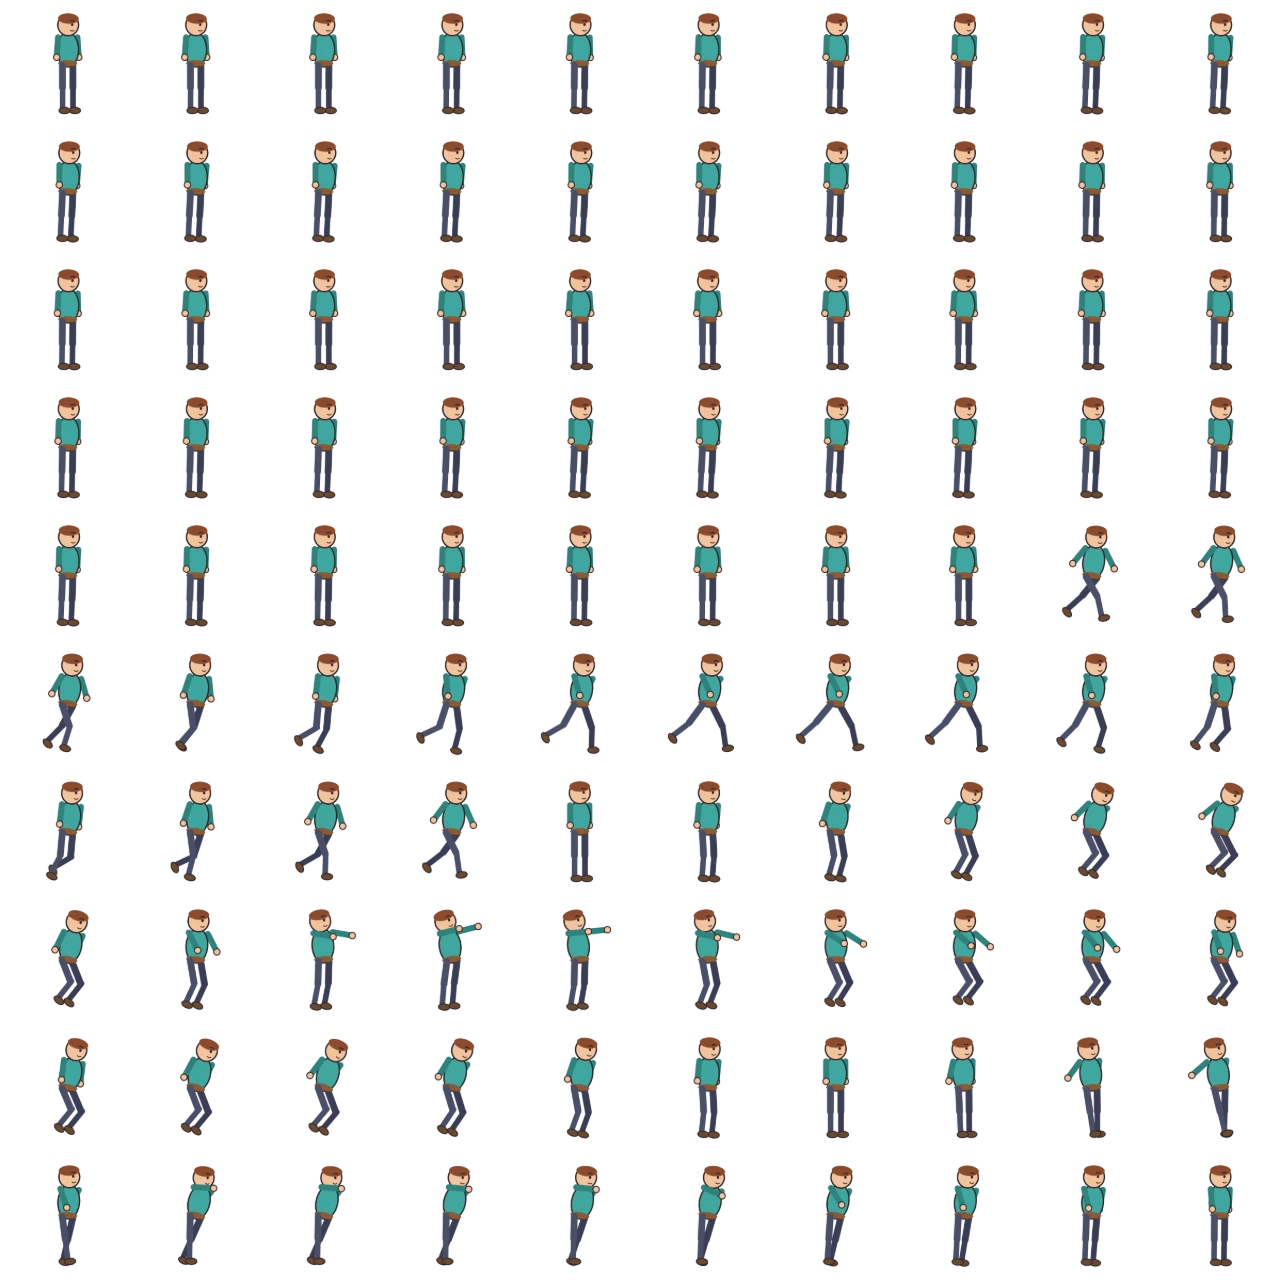
Why rig first, bake later
Drawing every frame of a run cycle by hand is slow, and changing the design afterwards means redrawing all of it. A rigged character turns that around: the drawing exists once, bones and keyframes produce the motion, and the sprite sheet is just a render. Change the character's colours, swap a hat or retime the run, and you export again.
The frames are rendered from vector art at the scene's resolution and scaled down with high-quality filtering, so a 64-pixel sheet for a mobile game and a 512-pixel one for a trailer come from the same file, both crisp. For frames larger than the scene itself, enlarge the scene first with scale content on.
Exporting the sheet
- Split the motion into clips. Each clip (idle, run, jump, attack) becomes its own animation in the sheet. Your main timeline is exported too, as
default. - Open the dialog. File → Export → Game engine… and keep the format Sprite sheet (baked frames).
- Set the frame height. Width follows the scene's aspect ratio, so a square scene gives square frames.
- Choose every Nth frame. 1 keeps every frame; 2 halves the frame count and the playback rate, which is often plenty for small characters.
- Pick the engine. Godot 4 writes a ready
SpriteFramesresource; Unity and Other (JSON) write the atlas plus a JSON file.
The atlas has a transparent background: the scene's background colour is left out so the character drops onto any level.
The JSON, field by field
This is the file the demo fighter produced, unedited: 100 frames of 128×128 in a 10×10 grid. Frames are numbered from 0, left to right and then top to bottom.
{
  "image": "spritesheet.png",
  "frameWidth": 128,
  "frameHeight": 128,
  "frames": 100,
  "columns": 10,
  "rows": 10,
  "fps": 24,
  "sourceFps": 24,
  "frameStep": 1,
  "animations": [
    {
      "name": "default",
      "from": 0,
      "to": 23,
      "loop": true
    },
    {
      "name": "idle",
      "from": 24,
      "to": 47,
      "loop": true
    },
    {
      "name": "run",
      "from": 48,
      "to": 63,
      "loop": true
    },
    {
      "name": "jump",
      "from": 64,
      "to": 85,
      "loop": false
    },
    {
      "name": "attack",
      "from": 86,
      "to": 99,
      "loop": false
    }
  ]
}| Field | Meaning |
|---|---|
frameWidth, frameHeight | Size of one cell in pixels. Use them to slice the grid. |
columns, rows, frames | Grid layout and the number of used cells; the last row may be partly empty. |
fps | Playback rate for the baked frames: the scene rate divided by frameStep. |
animations | One entry per clip: first and last frame index and whether it loops. |
Loading it in your engine
Godot 4
Put spritesheet.png and spritesheet.tres in the project, add an AnimatedSprite2D, set its Sprite Frames to the .tres and call $AnimatedSprite2D.play("run"). Every clip is already an animation with the right speed and loop setting. For a rigged character with bones instead of baked frames, see the Godot skeletal export.
Unity
Import the PNG, set Sprite Mode to Multiple, open the Sprite Editor and slice Grid By Cell Size with the frameWidth and frameHeight from the JSON. The animations ranges tell you which sprites belong to each animation clip.
Phaser 3 or any JavaScript engine
The JSON maps straight onto a sprite-sheet loader. In Phaser:
// preload()
this.load.spritesheet("hero", "spritesheet.png", { frameWidth: 128, frameHeight: 128 });
this.load.json("heroMeta", "spritesheet.json");

// create()
const meta = this.cache.json.get("heroMeta");
for (const a of meta.animations) {
  this.anims.create({
    key: a.name,
    frames: this.anims.generateFrameNumbers("hero", { start: a.from, end: a.to }),
    frameRate: meta.fps,
    repeat: a.loop ? -1 : 0,
  });
}
this.add.sprite(200, 300, "hero").play("run");
Sizing and frame rate
- Frame height drives everything. Pick the height the character will be on screen, doubled if you target high-density displays, and keep it at or below the scene height.
- Watch the atlas size. The exporter refuses sheets wider or taller than 16,000 pixels, which is about what browsers can allocate. Lower the frame height or export every second frame to fit.
- Animate at 24 fps, export at 12. A common trick for small sprites: keep smooth motion in the editor and use Every Nth frame = 2 for a snappier, lighter sheet.
- Keep clips in place. Clips are baked without the main timeline's root motion, so a run cycle stays centred in its cells and your game moves the sprite.
FAQ
Is the background transparent?
Yes. The scene's background colour is not rendered into the sheet.
Can I export a single animation?
Yes. Turn off Each clip → its own animation to bake only the main timeline, or keep it on and use the ranges you need.
Does it work for pixel art?
pinkcel draws vector art, so frames come out smooth and anti-aliased rather than pixel-perfect. It suits cartoon and illustrated styles best.
Where do the files go?
They download to your computer. Rendering happens in your browser and nothing is uploaded.
Is it free?
Yes, with no watermark and no limit on exports.
Bake your first sprite sheet
Open the editor, insert the ready-made character from the layers panel or draw your own, and export a sheet in a couple of minutes.
Open the editor, free